Running GitLab on Kubernetes is remarkably straightforward if you stick to the official Helm chart—until you hit the database tier. The bundled PostgreSQL and Redis instances are perfectly fine for taking GitLab for a spin, but they are single points of failure. The moment one of those pods restarts, your entire CI/CD pipeline grinds to a halt.
This guide walks you through replacing those fragile bundled databases with true, production-grade Highly Available (HA) clusters managed by KubeBlocks. We will set up PostgreSQL with Patroni (for streaming replication and automatic primary election) and Redis with Sentinel (1 primary, 1 replica, and 3 sentinels).
Every command below has been tested on EKS using KubeBlocks 1.0.2.
KubeBlocks is an open-source Kubernetes operator for running and managing databases and stateful middleware. It supports 30+ database engines—including PostgreSQL, Redis, MySQL, MongoDB, and Kafka—through a unified API surface. Instead of writing StatefulSets and sidecar logic by hand, you describe what you want (topology, version, resources) and KubeBlocks handles provisioning, HA configuration, credential management, and day-2 operations.
Before diving in, make sure you have the following:
kubectl configuredIf you haven't installed KubeBlocks yet, you can add it quickly:
helm repo add kubeblocks https://apecloud.github.io/helm-charts
helm repo update

helm install kubeblocks kubeblocks/kubeblocks \
  --namespace kb-system \
  --create-namespace \
  --version 1.0.2
Wait for the operator to become fully ready:
kubectl wait --for=condition=ready pod \
  -l app.kubernetes.io/name=kubeblocks \
  -n kb-system \
  --timeout=120s
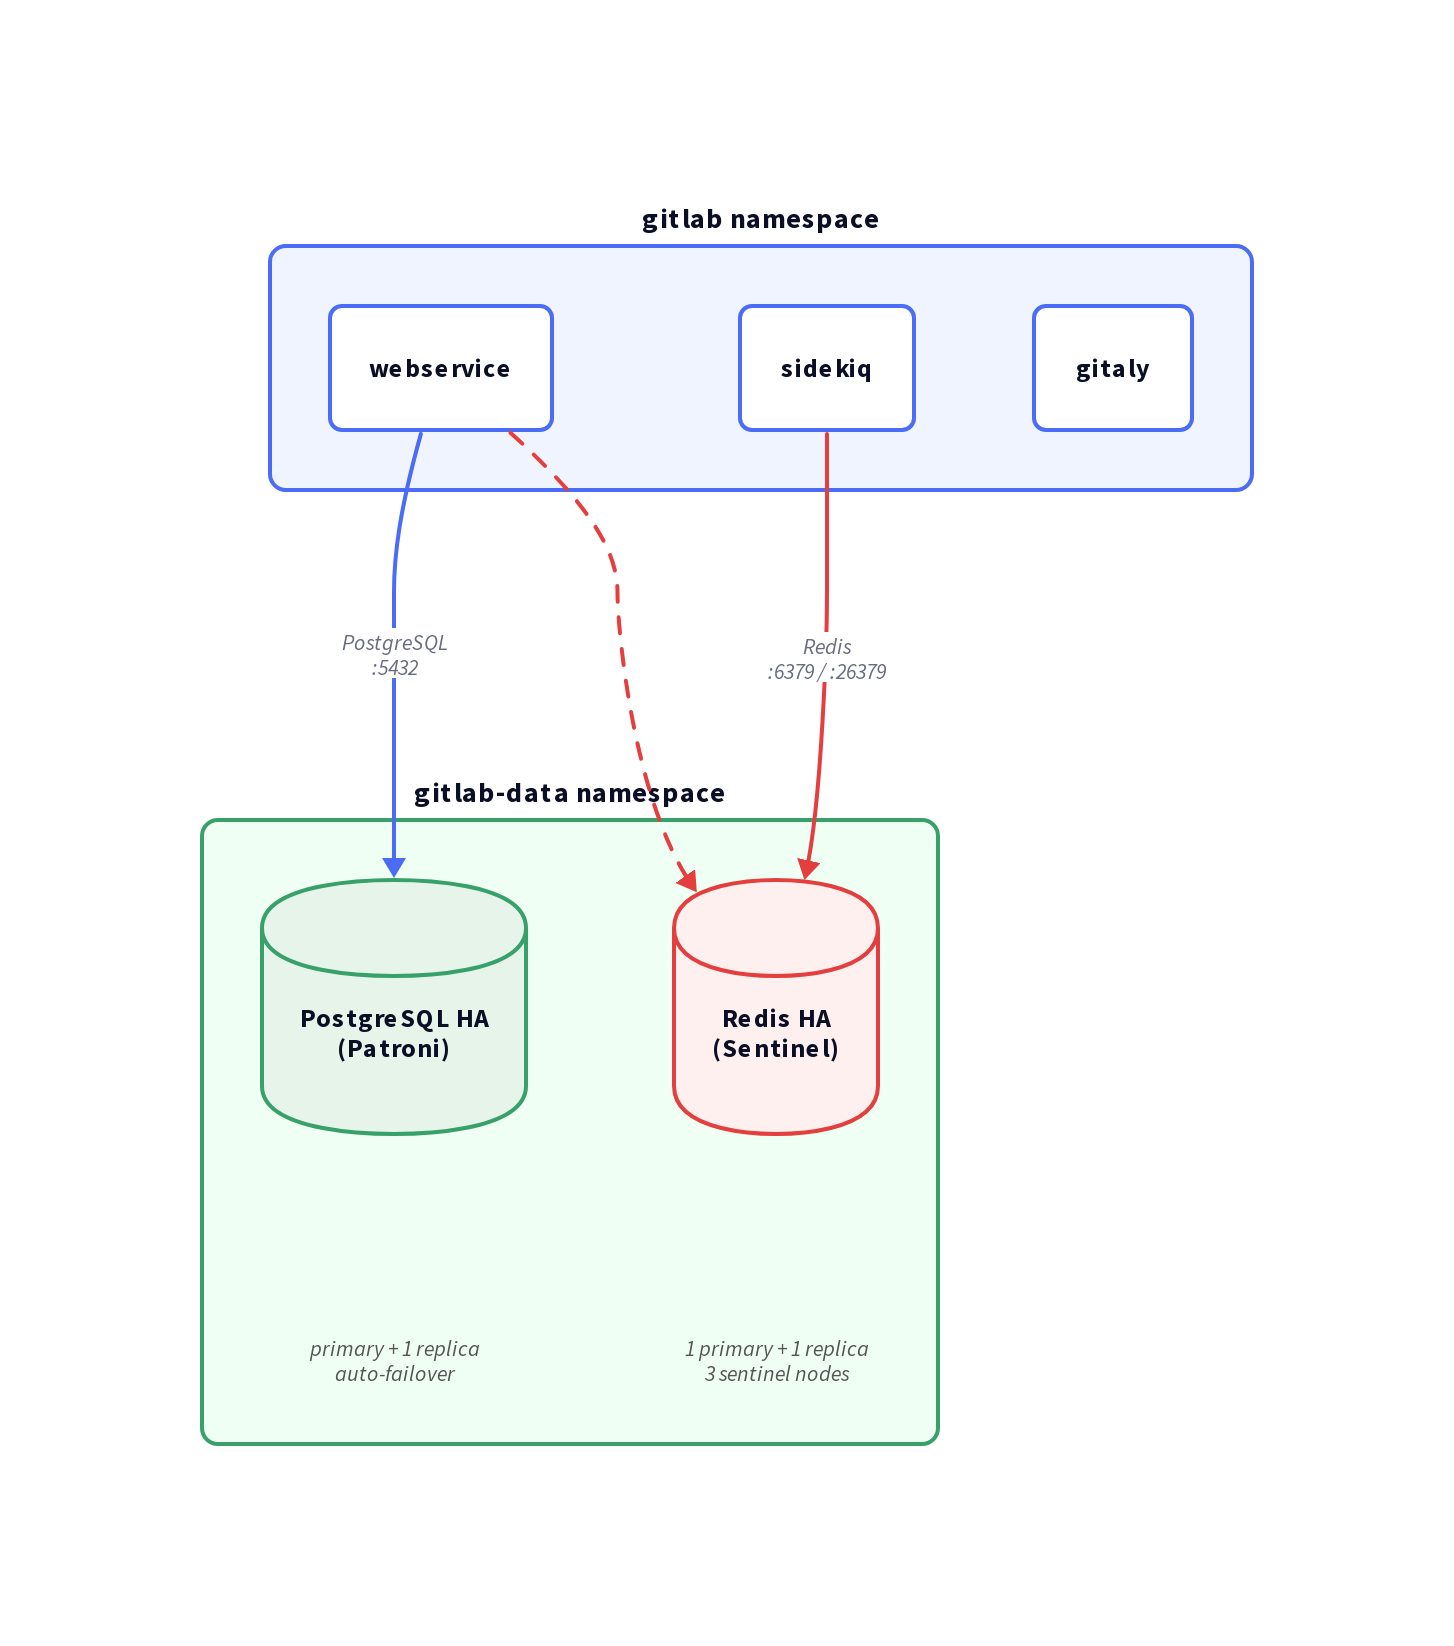
To keep things clean, we will deploy both database clusters into a dedicated gitlab-data namespace. This strictly isolates the stateful data layer from GitLab's stateless application pods.
First, let's create the isolated namespace for our data layer.
kubectl create namespace gitlab-data
KubeBlocks ships with a PostgreSQL addon built on Patroni—a battle-tested HA solution that handles leader election, streaming replication, and automatic failover seamlessly. See the PostgreSQL quickstart for standalone usage.
Deploy the cluster using Helm:
helm install gitlab-pg kubeblocks/postgresql-cluster \
  --namespace gitlab-data \
  --set version=16.4.0 \
  --set mode=replication \
  --set replicas=2 \
  --set cpu=2 \
  --set memory=4 \
  --set storage=50 \
  --set terminationPolicy=Delete
Here is exactly what these parameters do:
mode=replication — Enables Patroni streaming replication (1 primary + N-1 replicas).replicas=2 — Deploys 1 primary and 1 standby. (This is sufficient for this guide, but see the production note below).terminationPolicy=Delete — Allows helm delete to remove the cluster.Production Note: We use replicas=2 here to keep tutorial costs low. For actual production environments, you should use replicas=3. With only 2 nodes and no external Distributed Configuration Store (like etcd or Consul), Patroni cannot establish a quorum during a network partition. In that scenario, it will pause the primary to prevent split-brain, rather than failing over. Three replicas give Patroni the majority vote it needs to fail over safely without external dependencies.
Wait for the cluster to reach the Running state:
kubectl wait --for=jsonpath='{.status.phase}'=Running \
  cluster/gitlab-pg \
  -n gitlab-data \
  --timeout=300s
Let's verify that replication is actively working:
PG_USER=$(kubectl get secret -n gitlab-data gitlab-pg-postgresql-account-postgres \
  -o jsonpath='{.data.username}' | base64 -d)
PG_PASS=$(kubectl get secret -n gitlab-data gitlab-pg-postgresql-account-postgres \
  -o jsonpath='{.data.password}' | base64 -d)

# Check pod-0
kubectl exec -n gitlab-data gitlab-pg-postgresql-0 -c postgresql -- \
  env PGUSER="$PG_USER" PGPASSWORD="$PG_PASS" \
  psql -h gitlab-pg-postgresql-postgresql -c "SELECT pg_is_in_recovery();"

# Check pod-1
kubectl exec -n gitlab-data gitlab-pg-postgresql-1 -c postgresql -- \
  env PGUSER="$PG_USER" PGPASSWORD="$PG_PASS" \
  psql -h gitlab-pg-postgresql-headless -c "SELECT pg_is_in_recovery();"
You should see output similar to this:
 pg_is_in_recovery
-------------------
 f                    ← pod-0 is the primary

 pg_is_in_recovery
-------------------
 t                    ← pod-1 is the replica
Next, we need to provision the specific database and user that GitLab expects.
Rather than identifying the primary pod manually, connect through the gitlab-pg-postgresql-postgresql Service — KubeBlocks keeps this ClusterIP service pointed at the current Patroni primary at all times. First, retrieve the postgres superuser credentials from the KubeBlocks-generated secret:
PG_USER=$(kubectl get secret -n gitlab-data gitlab-pg-postgresql-account-postgres \
  -o jsonpath='{.data.username}' | base64 -d)

PG_PASS=$(kubectl get secret -n gitlab-data gitlab-pg-postgresql-account-postgres \
  -o jsonpath='{.data.password}' | base64 -d)
Generate a password for the GitLab application user, then run all DDL through the service:
GITLAB_PG_PASS=$(openssl rand -base64 18 | tr -d '/+=')
echo "Save this password: $GITLAB_PG_PASS"

kubectl exec -n gitlab-data gitlab-pg-postgresql-0 -c postgresql -- \
  env PGUSER="$PG_USER" PGPASSWORD="$PG_PASS" \
  psql -h gitlab-pg-postgresql-postgresql \
  -c "CREATE USER gitlab WITH PASSWORD '$GITLAB_PG_PASS';"

kubectl exec -n gitlab-data gitlab-pg-postgresql-0 -c postgresql -- \
  env PGUSER="$PG_USER" PGPASSWORD="$PG_PASS" \
  psql -h gitlab-pg-postgresql-postgresql \
  -c "CREATE DATABASE gitlabhq_production OWNER gitlab;"

kubectl exec -n gitlab-data gitlab-pg-postgresql-0 -c postgresql -- \
  env PGUSER="$PG_USER" PGPASSWORD="$PG_PASS" \
  psql -h gitlab-pg-postgresql-postgresql \
  -c "GRANT ALL PRIVILEGES ON DATABASE gitlabhq_production TO gitlab;"
Note: Connecting via -h gitlab-pg-postgresql-postgresql (the service) ensures DDL always lands on the primary, regardless of which pod you exec into. Direct local connections to a replica pod would fail with ERROR: cannot execute ... in a read-only transaction.
GitLab leans heavily on Redis for caching, managing Sidekiq job queues, and maintaining session state.
KubeBlocks' Redis addon replication topology deploys a complete HA stack. See the Redis quickstart for standalone usage.
To avoid Helm type-coercion issues with decimal values, it's best to create a redis-values.yaml file:
version: "7.2.10"
mode: replication
replicas: 2
cpu: 1
memory: 2
storage: 10
terminationPolicy: Delete
sentinel:
  replicas: 3
  cpu: 0.5
  memory: 0.5
  storage: 1
Deploy the Redis cluster:
helm install gitlab-redis kubeblocks/redis-cluster \
  --namespace gitlab-data \
  --values redis-values.yaml
Here is a breakdown of the key parameters:
mode=replication — Automatically deploys both the Redis and Sentinel components.replicas=2 — Provisions 1 primary and 1 replica for the Redis data nodes.sentinel.replicas=3 — Provisions 3 Sentinel nodes, establishing a quorum of 2.Wait for the cluster to become Running:
kubectl wait --for=jsonpath='{.status.phase}'=Running \
  cluster/gitlab-redis \
  -n gitlab-data \
  --timeout=300s
Now, let's verify that Sentinel is actively monitoring the master node:
SENTINEL_PASS=$(kubectl get secret gitlab-redis-redis-sentinel-account-default \
  -n gitlab-data \
  -o jsonpath='{.data.password}' | base64 -d)

kubectl exec -n gitlab-data gitlab-redis-redis-sentinel-0 -c redis-sentinel -- \
  redis-cli -p 26379 -a "$SENTINEL_PASS" sentinel masters
You should see output containing these specific lines:
name
gitlab-redis-redis
ip
gitlab-redis-redis-0.gitlab-redis-redis-headless.gitlab-data.svc.cluster.local
port
6379
flags
master
num-slaves
1
num-other-sentinels
2
quorum
2
The num-slaves: 1 and num-other-sentinels: 2 values confirm that you have a healthy 1+1 Redis cluster with all 3 Sentinels online and watching.
GitLab reads its database credentials directly from Kubernetes Secrets. We need to create these secrets in the gitlab namespace (or whichever namespace you plan to deploy the GitLab application into).
kubectl create namespace gitlab

# Create the PostgreSQL password secret
# $GITLAB_PG_PASS was set in Step 3
kubectl create secret generic gitlab-postgresql-password \
  --namespace gitlab \
  --from-literal=main-gitlab-password="$GITLAB_PG_PASS"

# Extract the Redis password from the KubeBlocks-generated secret
REDIS_PASS=$(kubectl get secret gitlab-redis-redis-account-default \
  -n gitlab-data \
  -o jsonpath='{.data.password}' | base64 -d)

# Create the Redis password secret for GitLab
kubectl create secret generic gitlab-redis-secret \
  --namespace gitlab \
  --from-literal=redis-password="$REDIS_PASS"

# Extract the Sentinel auth password (this is separate from the Redis data password)
SENTINEL_PASS=$(kubectl get secret gitlab-redis-redis-sentinel-account-default \
  -n gitlab-data \
  -o jsonpath='{.data.password}' | base64 -d)

# Create the Sentinel password secret for GitLab
kubectl create secret generic gitlab-redis-sentinel-secret \
  --namespace gitlab \
  --from-literal=sentinel-password="$SENTINEL_PASS"
Why do we need two Redis secrets? KubeBlocks manages the Redis data nodes and the Sentinel nodes using entirely separate credentials for enhanced security. The sentinel password is used specifically for AUTH on the sentinel port (26379), while the standard Redis password is used for AUTH on the actual data port (6379).
Now we are ready for the main event. Add the GitLab Helm repository and prepare the values file to wire up our external, highly available databases.
helm repo add gitlab https://charts.gitlab.io/
helm repo update
Create a gitlab-values.yaml file:
global:
  hosts:
    domain: gitlab.example.com   # Replace this with your actual domain
    https: true

  ## External PostgreSQL (KubeBlocks Patroni cluster)
  psql:
    host: gitlab-pg-postgresql-postgresql.gitlab-data.svc.cluster.local
    port: 5432
    username: gitlab
    database: gitlabhq_production
    password:
      useSecret: true
      secret: gitlab-postgresql-password
      key: main-gitlab-password

  ## External Redis (KubeBlocks Sentinel cluster)
  redis:
    # IMPORTANT: The 'host' here must be the Sentinel MASTER NAME, not the sentinel service hostname.
    # KubeBlocks assigns the master name based on the cluster: <release>-<component>
    host: gitlab-redis-redis
    port: 6379
    auth:
      enabled: true
      secret: gitlab-redis-secret
      key: redis-password
    sentinels:
      - host: gitlab-redis-redis-sentinel-redis-sentinel.gitlab-data.svc.cluster.local
        port: 26379
    sentinelAuth:
      enabled: true
      secret: gitlab-redis-sentinel-secret
      key: sentinel-password

# Explicitly disable the bundled PostgreSQL and Redis instances
postgresql:
  install: false

redis:
  install: false

# Disable the bundled cert-manager (Note: GitLab chart 9.x uses 'installCertmanager', not 'certmanager.install')
installCertmanager: false

certmanager-issuer:
  email: your@email.com
Deploy GitLab:
helm install gitlab gitlab/gitlab \
  --namespace gitlab \
  --values gitlab-values.yaml \
  --timeout 600s
Note: GitLab's initial deployment is heavy. It pulls several large images and executes extensive database migrations. Give the gitlab-migrations job a solid 5–10 minutes to complete before expecting the rest of the application pods to become ready.
Check the status of the GitLab pods (remember to give it a few minutes for migrations to finish):
kubectl get pods -n gitlab
You are looking for an output where all application pods are Running with zero restarts, and the migrations pod has cleanly finished:
NAME                                  READY   STATUS      RESTARTS
gitlab-gitaly-0                       1/1     Running     0
gitlab-gitlab-exporter-xxx            1/1     Running     0
gitlab-gitlab-shell-xxx               1/1     Running     0
gitlab-migrations-xxx                 0/1     Completed   0
gitlab-sidekiq-all-in-1-xxx           1/1     Running     0
gitlab-webservice-default-xxx         2/2     Running     0
...
The fact that gitlab-migrations-xxx is Completed (rather than running or crashing) is your confirmation that the database schema was applied successfully to the external PostgreSQL cluster.
To test database connectivity directly from the application layer, run this inside a webservice pod:
WEBSERVICE_POD=$(kubectl get pods -n gitlab -l app=webservice -o name | head -1)

kubectl exec -n gitlab $WEBSERVICE_POD -c webservice -- \
  /srv/gitlab/bin/rails runner "puts Gitlab::Database.main.version" 2>&1
If you don't have direct access to the LoadBalancer (for instance, if you are testing locally or have strict security groups on your ELB), you can use kubectl port-forward to access the GitLab UI directly from your workstation:
# Retrieve the initial root password
kubectl get secret gitlab-gitlab-initial-root-password \
  -n gitlab \
  -o jsonpath='{.data.password}' | base64 -d && echo

# Forward the nginx-ingress controller to your localhost
kubectl port-forward -n gitlab svc/gitlab-nginx-ingress-controller 8888:80
Open your browser to http://localhost:8888/users/sign_in and log in using:
rootNote: After logging in, GitLab might try to redirect you to http://localhost/users/sign_in (dropping the port). Simply navigate back to http://localhost:8888/users/sign_in manually to stay on the port-forwarded connection.
How does GitLab actually maintain connections to these HA clusters without getting confused during a failover event?
| Property | Value |
|---|---|
| Service | gitlab-pg-postgresql-postgresql.gitlab-data.svc.cluster.local |
| Port | 5432 |
| Username | gitlab |
| Database | gitlabhq_production |
| HA Mechanism | Patroni (automatic primary election) |
The -postgresql service is a standard ClusterIP service (non-headless) that KubeBlocks dynamically manages. It is guaranteed to always point to the current Patroni primary. When a failover occurs, Patroni promotes the standby and updates the service selector under the hood. From GitLab's perspective, no reconfiguration is needed; the connection simply drops for a moment and immediately reconnects to the newly promoted primary.
| Property | Value |
|---|---|
| Sentinel Service | gitlab-redis-redis-sentinel-redis-sentinel.gitlab-data.svc.cluster.local |
| Sentinel Port | 26379 |
| Master Name | gitlab-redis-redis |
| HA Mechanism | Sentinel (automatic master election) |
GitLab's underlying Rails stack supports Redis Sentinel natively via the sentinels: configuration block. When a Redis master fails, the Sentinel nodes elect a new master within seconds and proactively notify all connected clients (like Sidekiq) to redirect their traffic to the new master IP.
Important: In the GitLab Helm chart, when sentinels is configured, the global.redis.host field actually serves as the Sentinel master name, not the service hostname. KubeBlocks systematically names the master after the cluster itself: <helm-release>-<component>. So, for a release named gitlab-redis with the component redis, the master name is exactly gitlab-redis-redis. You can always verify this manually by running redis-cli -p 26379 sentinel masters.
Don't just trust the theory. Let's intentionally break things and watch the system recover.
First, identify the current primary, delete its pod, and watch Patroni promote the replica in real-time:
PG_USER=$(kubectl get secret -n gitlab-data gitlab-pg-postgresql-account-postgres \
  -o jsonpath='{.data.username}' | base64 -d)
PG_PASS=$(kubectl get secret -n gitlab-data gitlab-pg-postgresql-account-postgres \
  -o jsonpath='{.data.password}' | base64 -d)

# Kill pod-0 (assuming it is currently primary)
kubectl delete pod gitlab-pg-postgresql-0 -n gitlab-data

# Watch the service-connected query — once pg_is_in_recovery returns 'f',
# Patroni has promoted a new primary and the service is already pointing to it
watch kubectl exec -n gitlab-data gitlab-pg-postgresql-1 -c postgresql -- \
  env PGUSER="$PG_USER" PGPASSWORD="$PG_PASS" \
  psql -h gitlab-pg-postgresql-postgresql -c "SELECT pg_is_in_recovery();"
The moment pg_is_in_recovery returns f via the service query, failover is complete. Because we're querying through the ClusterIP service, a f result confirms the service has already redirected to the new primary — GitLab's connection pool will recover automatically.
REDIS_PASS=$(kubectl get secret gitlab-redis-redis-account-default \
  -n gitlab-data -o jsonpath='{.data.password}' | base64 -d)

# Confirm the current master
kubectl exec -n gitlab-data gitlab-redis-redis-0 -c redis -- \
  redis-cli -a "$REDIS_PASS" role

# Kill the master pod
kubectl delete pod gitlab-redis-redis-0 -n gitlab-data

# Sentinel detects the failure and promotes the replica within ~20 seconds.
# Let's check the new master via Sentinel:
SENTINEL_PASS=$(kubectl get secret gitlab-redis-redis-sentinel-account-default \
  -n gitlab-data -o jsonpath='{.data.password}' | base64 -d)

kubectl exec -n gitlab-data gitlab-redis-redis-sentinel-0 -c redis-sentinel -- \
  redis-cli -p 26379 -a "$SENTINEL_PASS" sentinel masters | grep -A1 "^ip"
Need more read capacity? You can scale the cluster dynamically:
# Scale the cluster to 1 primary + 2 replicas
kubectl patch cluster gitlab-pg -n gitlab-data \
  --type='json' \
  -p='[{"op":"replace","path":"/spec/componentSpecs/0/replicas","value":3}]'
KubeBlocks supports in-place minor version upgrades with zero downtime. It performs a rolling update of the replicas first, followed by a controlled primary failover:
kubectl apply -f - <<EOF
apiVersion: operations.kubeblocks.io/v1alpha1
kind: OpsRequest
metadata:
  name: pg-upgrade
  namespace: gitlab-data
spec:
  clusterName: gitlab-pg
  type: Upgrade
  upgrade:
    components:
      - componentName: postgresql
        serviceVersion: "16.9.0"
EOF
Running out of disk space? Expand the volume seamlessly:
kubectl apply -f - <<EOF
apiVersion: operations.kubeblocks.io/v1alpha1
kind: OpsRequest
metadata:
  name: pg-volume-expand
  namespace: gitlab-data
spec:
  clusterName: gitlab-pg
  type: VolumeExpansion
  volumeExpansion:
    - componentName: postgresql
      volumeClaimTemplates:
        - name: data
          storage: "100Gi"
EOF
Backup is not optional in production. For a GitLab deployment, the two stateful components that absolutely must be backed up are:
KubeBlocks provides a unified, Kubernetes-native backup API for both databases. The general workflow looks like this:
Restore) or standard Backup/Restore Custom Resources to recover when disaster strikes.For detailed, step-by-step instructions, refer to the official documentation:
Tip: Always configure your BackupRepo and BackupSchedule before going live. If you suffer a catastrophic double-node failure on a replicas=2 cluster without a backup, recovery is impossible.
If you are just testing and want to tear everything down:
helm delete gitlab -n gitlab
helm delete gitlab-pg -n gitlab-data
helm delete gitlab-redis -n gitlab-data

# Delete the PersistentVolumeClaims if you want to permanently wipe the data
kubectl delete pvc -n gitlab-data --all

# Finally, remove the namespaces
kubectl delete namespace gitlab gitlab-data
| Component | Before | After |
|---|---|---|
| PostgreSQL | Bundled single-instance | Patroni HA: 1 primary + 1 replica, auto-failover |
| Redis | Bundled standalone | Sentinel HA: 1 primary + 1 replica + 3 sentinels |
| Failover | Manual / none | Automatic within 10–30 seconds |
| Scaling | Manual pod management | Native kubectl patch or OpsRequest |
| Version Upgrade | Downtime required | Rolling in-place via KubeBlocks OpsRequest |
KubeBlocks entirely abstracts the operational complexity of running stateful databases on Kubernetes. It handles provisioning, HA configuration, credential management, and day-2 operations through a single, unified API. For your GitLab deployment, this means the database tier is genuinely production-ready from day one—all without you having to write a single line of StatefulSet YAML.